سلام دوستان . من داشتم در مورد پروژم دنبال ماژول دوربین و ..... میگشتم که به سایتی مواجه شدم ....
خوب همونجور که می دونید میکروکنترلرشون همون AVR یا ARM هستن که بعضی از مدل هاش صنعتی هم هستن .... خوبی این برد اینه که کامپایلرش OPEN Source و تمامی ماژول های ارتباطیش همراه با مثال هستند و قیمت ین ماژول ها هم اگه نگاه کنید بد نیست ....
مثلا ماژول پریتر که کمتر جایی پیدا میشه رو داشت همراه با مثال :
ماژول پرینتر حرارتی سریال TTL
پرینترهای حرارتی همان پرینترهای بکار رفته درسوپر مارکتها ، دستگاه هاي كارتخوان، عابر بانك يا سيستمهاي نوبت دهي هستند. جهت رسید های پرداخت در فروشگاه ها معمولا از پرینترهای حرارتی استفاده میکنند.این پرینترها دارای عملکرد سریع ،آسان و ارزان برای پرینت روی رول های کاغذ هستند. مکانیزم جدید چاپ تحت عنوان چاپ با حرارت یا چاپگرهای حرارتی معرفی شده اند. در این نوع چاپ نیاز به جوهر نیست در واقع هد دستگاه توسط ایجاد حرارت بر روی کاغذ مینویسد. البته باید توجه داشت که کاغذ از نوع خاص میباشد و در واقع در این مکانیزم نیاز به کاغذی داریم که در مقابل حرارت حساس بوده و واکنش نشان دهد.پرینترهای حرارتی صدور فیش در دو نوع تک رنگ (سیاه و سفید) و ۲ رنگ در بازار موجود است که کارایی نوع ۲ رنگ آن به علت عدم وجود کاغذ دو رنگدر بازار ایران مانند پرینترهای تک رنگ است. اين پرينتر گزينه مناسبی برای سيستمهاي اندازه گيري، تجهيزات پزشكي، دستگاههاي نوبت دهي، سيستمهاي سفارش و فروش است.شما می توانید با استفاده از آردینو این پرینتر را راه اندازی کنید.
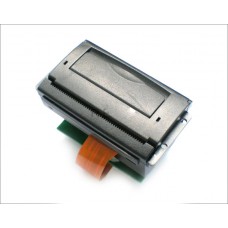
مشخصات
روش پرینت: نقطه خط حرارتی
سرعت پرینت: 50-85mm/s
رزولیشن: 8dots/mm, 384 dots/line
عرض موثر پرینت: 48mm
نوع کاغذ: کاغذ حرارتی
ماکزیمم قطر رول کاغذ: 22MM
کاراکتر: ASCII
فونت پرینت: ANK9x17,12x24
رابط: RS232/TTL
تغذیه: 5V-9V یا 12VDC
مثال
در این مثال پرینتر از طریق ارتباط سریال با آردوینو کلمه "Hello" را چاپ می کند.
کد:
#include <SoftwareSerial.h>
#include <Thermal.h>
int printer_RX_Pin = 2;
int printer_TX_Pin = 3;
Thermal printer(printer_RX_Pin, printer_TX_Pin, 19200);
void setup(){
////////////////////////////////////////////////////////////////////
//Following are in setup, but do not need to be. Use them anywhere.
//Just here so they do not just keep printing over and over
//Printer will ignore commands during printing, so use delay(3000)
//after prints to ensure it see everything you want to print.
//SOME FUNCTIONS WILL FEED A LINE WHEN CALLED TO SOLIDIFY SETTING
////////////////////////////////////////////////////////////////////
printer.justify('R'); //sets text justification (right, left, center) accepts 'L', 'C', 'R'
printer.setSize('L'); // set type size, accepts 'S', 'M', 'L'
printer.println("hello"); //print line
printer.setSize('M'); // set type size, accepts 'S', 'M', 'L'
printer.println("hello"); //print line
printer.setSize('S'); // set type size, accepts 'S', 'M', 'L'
printer.println("hello"); //print line
printer.feed(); //advance one line
printer.feed(); //advance one line
//printer.setHeatTime(80); // 80 is default from page 23 of datasheet. Controls speed of printing and darkness
//printer.setHeatInterval(2); // 2 is default from page 23 of datasheet. Controls speed of printing and darkness
//printer.setPrintDensity(15); // Not sure what the defaut is. Testing shows the max helps darken text. From page 23.
//printer.setPrintBreakTime(15); // Not sure what the defaut is. Testing shows the max helps darken text. From page 23.
//printer.print("hello"); //add text to print line without printing it. Call println to print.//printer.print(1234);
//printer.println("hello"); //print line//printer.println(1234);
//printer.printBarcode("123456789123"); //print simple bar code - up to 12 characters long//printer.printFancyBarCode("WWW.BILDR.ORG"); // print fancy barcode. Cap latters and some symbols
//printer.printFancyBarcode("WWW.BILDR.ORG"); // print fancy barcode. Cap latters and some symbols
//printer.setBarcodeHeight(50); // set barcode px height: 0-255
//printer.boldOn(); // Turn bold on//printer.boldOff(); //Rurn bold off
//printer.doubleHeightOn(); // sets type to print double hight//printer.doubleHeightOff(); //Turn off double hight printing
//printer.inverseOn(); //set to print white on black//printer.inverseOff(); //set to print black on white (default)
//printer.sleep(); //Tell printer to sleep. MUST call wake before printing again, even if reset//printer.wake(); //Wake //printer.
//printer.wake();
//printer.setSize('L'); // set type size, accepts 'S', 'M', 'L'
//printer.feed(); //advance one line
//printer.tab(); //Tabs text over 8 spaces
//printer.justify('R'); //sets text justification (left, center, right) accepts 'L', 'C', 'R'
//printer.setDefault(); //set printer to defaults. ****WILL FEED SEVERAL LINES WHEN CALLED***
}
void loop(){
}
خوب یا مثلاماژول دوربین رنگی JPEG
این ماژول به شما این امکان را می دهد که عکس های JPEG بگیرید و از طریق
رابط UART آن را به خروجی بفرستید.عکس های رنگی گرفته شده توسط این ماژول
بر مبنای الگوریتم فشرده سازی JPEG می باشد. و رابط سریال امکان راه اندازی
آسان را توسط آردوینو برایتان فراهم می کند.عملکرد این ماژول به این صورت
است که یک فریم عکس را گرفته و بعد از فشرده سازی ،عکس را از طریق رابط
سریال ارسال می کند.این ماژول می تواند در سیستم های امنیتی و همچنین
روباتیک مورد استفاده قرارگیرد.
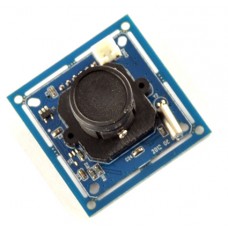 ویژگی ها
سنسور: 300000 CMOS
نرخ تصویر برداری: 1-25 فریم در ثانیه
پرسپکتیو: 90 درجه
دارای تکنولوژی دید در شب
الگوریتم فشرده سازی : JPEG
تغذیه: 5V
مد ارتباطی: TTL
رزولیشن: 640*480 320*240(پیش فرض)
Baud rate : پیش فرض 9600 و حداکثر تا 115200
مثال
در مثال زیر می توانید با اتصال ماژول به آردوینو از طریق رابط سریال تصویر گرفته توسط دوربین را در Serial Monitor نمایش دهید.
کد:
#include <SoftwareSerial.h>
byte incomingbyte;
//Configure pin 2 and 3 as soft serial port
SoftwareSerial cameraSerial = SoftwareSerial(2, 3);
int a=0x0000, //Read Starting address
j=0,
k=0,
count=0;
uint8_t MH,ML;
boolean EndFlag=0;
void setup() {
Serial.begin(19200);
cameraSerial.begin(38400);
SendResetCmd();
delay(3000);
}
void loop() {
SendTakePhotoCmd();
Serial.println("Start pic");
delay(100);
while(cameraSerial.available()>0) {
incomingbyte=cameraSerial.read();
}
byte b[32];
while(!EndFlag) {
j=0;
k=0;
count=0;
SendReadDataCmd();
delay(75); //try going up
while(cameraSerial.available()>0) {
incomingbyte=cameraSerial.read();
k++;
if((k>5)&&(j<32)&&(!EndFlag)) {
b[j]=incomingbyte;
if((b[j-1]==0xFF)&&(b[j]==0xD9))
EndFlag=1;
j++;
count++;
}
}
for(j=0;j<count;j++) {
if(b[j]<0x10)
Serial.print("0");
Serial.print(b[j], HEX);
}
Serial.println();
}
delay(3000);
EndFlag = 0; // reset so that another picture can be taken
Serial.println("End of pic");
Serial.println();
}
//Send Reset command
void SendResetCmd() {
cameraSerial.write((byte)0x56);
cameraSerial.write((byte)0x00);
cameraSerial.write((byte)0x26);
cameraSerial.write((byte)0x00);
}
//Send take picture command
void SendTakePhotoCmd() {
cameraSerial.write((byte)0x56);
cameraSerial.write((byte)0x00);
cameraSerial.write((byte)0x36);
cameraSerial.write((byte)0x01);
cameraSerial.write((byte)0x00);
a = 0x0000; //reset so that another picture can taken
}
void FrameSize() {
cameraSerial.write((byte)0x56);
cameraSerial.write((byte)0x00);
cameraSerial.write((byte)0x34);
cameraSerial.write((byte)0x01);
cameraSerial.write((byte)0x00);
}
//Read data
void SendReadDataCmd() {
MH=a/0x100;
ML=a%0x100;
cameraSerial.write((byte)0x56);
cameraSerial.write((byte)0x00);
cameraSerial.write((byte)0x32);
cameraSerial.write((byte)0x0c);
cameraSerial.write((byte)0x00);
cameraSerial.write((byte)0x0a);
cameraSerial.write((byte)0x00);
cameraSerial.write((byte)0x00);
cameraSerial.write((byte)MH);
cameraSerial.write((byte)ML);
cameraSerial.write((byte)0x00);
cameraSerial.write((byte)0x00);
cameraSerial.write((byte)0x00);
cameraSerial.write((byte)0x20);
cameraSerial.write((byte)0x00);
cameraSerial.write((byte)0x0a);
a+=0x20;
}
void StopTakePhotoCmd() {
cameraSerial.write((byte)0x56);
cameraSerial.write((byte)0x00);
cameraSerial.write((byte)0x36);
cameraSerial.write((byte)0x01);
cameraSerial.write((byte)0x03);
}
درسته اساسش با میکرو های دیگه خیلی فرقی نداره . حالا من نظرم اینه که اگه خوبه بیایم روش کار کنیم و ارتباط با ماژولاشو از طریق لایبراریهاش پیدا کنیم و بتونیم خودمون کتابخونه هایی واسه پروژه هامون طراحی کنیم


 پاسخ با نقل قول